July 23, 2010

Cake Makin'

The last few months have brought some first, paid cakes for my sister and I.  We have been making cakes for a few years now, mostly for our nieces' and nephews' birthdays, family events and church functions.  Through a few referrals, we've been approached to make cakes for a baby shower, a wedding and a first birthday party.

Last weekend, we baked and decorated the wedding cake and it turned out looking great.  (I was told it tasted good, too!)


The couple wanted a simple, fondant covered cake with purple ribbons.  They wanted it to look similar to the card box they made and they gave use some artificial flowers and petals to use for the display.  


Their cake topper was simple and elegant and a simple cake design complimented it nicely.

The baby shower was back in June and, for the cake, we were just told "it's going to be a boy, so put some blue on it."  He had some fun with it.


The giraffe was modeled from fondant mixed with tylose powder. (a hardening agent)


We also made some iPhone app cupcakes for our oldest sister's May birthday.  She was attending a meeting for app developers on the day of her birthday and made the request for these.  Some of the cupcakes were custom made for apps designed by those in attendance.  They were a big hit!


And I made some floral-themed, fondant-covered cupcakes for Mother's Day.


I'm really excited about the recent business.  We've been wanting to make a cake business/home bakery official for a while and are in the process of making that happen.  I've been thinking of some potential business names and brainstorming some ideas for marketing our services.  The pieces are falling into place!  :-)

July 22, 2010

Adventures in Gardening

I never really showed an interest in gardening until this year.  My parents always had huge gardens and I hated having to help them weed.  To me, gardens always meant too much work.  When we bought the house, I thought it might be nice to try growing a container garden with a couple tomato plants and a few peppers.  I bought some large pots and vegetable-friendly potting soil, then figured I would pick up a few plants the next time I was at Lowe's or Home Depot.

One Friday, when the Mr. and I were at a large flea and farmer's market in Rogers, Ohio, we purchased a flat of vegetable plants for $12.  This was way more plants than what would fit in my containers and pots, but I thought that maybe I could plant a few among the landscaping and see what would happen.  We got Roma and Beefsteak tomatoes, red, yellow and green bell peppers, hot banana peppers, red chili peppers, and one each of  cucumber and zucchini plants.  After thinking it through, and potting a few plants, I asked my dad to use is rototiller to prep a small garden space behind our garage.  I had low expectations for our garden since I did nothing to prep the soil, but I figured it would be worth a shot at growing more plants since I'd only be out the $12.  I still didn't have enough room to plant everything, but I got a nice mix of vegetables in and they started to grow.

I picked up a couple of herbs (basil, parsley & mint) and some more pots and we were well on our way to becoming green thumbs.

Since then, I've seen a lot of growth in my garden.  This hasn't been without a few losses.  We have squirrels and rabbits that created some damage early on, but things are really starting to produce.  I've learned some things along the way and am already thinking about changes I'll make for next year's garden.

Just yesterday, I noticed that our tomato plants are starting to turn.  Check this out!

This is a Beefsteak.


And we are starting to see some color changes in the Romas.


Right now, in all of my bell pepper plants, I have four tiny peppers.  There are lots of flowers, so we are expecting a few more.


The banana peppers are really taking off!  I have already picked two of them and there are lots more on the way.


So far, we've only had one zucchini, but I know these plants are big producers.  We are expecting lots and lots more!


And lastly, here are some chili peppers growing nicely in one of my pots. 


I don't have pictures of my cucumbers, but they are super small right now (about the size of a pinky finger).  The basil and mint is also doing well in the pots.  The parsley, sadly, was lost due to bunnies.

For the garden, I laid some black plastic to eliminate my need for weeding.  So far, it has served me well, but I will have to watch my plants closely as we enter into the hotter months to be sure the roots aren't suffering from heat damage.  I might try mulch next year.

It looks like we are going to have lots of ripe, red tomatoes soon and that makes me pretty happy!  I figured I'd be lucky to get a few veggies and it looks like I'll be getting a decent amount.  I'm also really excited about the hot peppers.  I love hot peppers!

July 12, 2010

The Big Kitchen Reveal

I'm sorry if I teased you with a sneak peek of our little kitchen and then slacked off with posting some more pictures.  The good news is that today is your lucky day!  We had an open house with a small group of family and friends on the Fourth of July and I finally got the kitchen/dining room looking presentable and somewhat decorated.  So, that means there are some pictures to share with you!

First up, let's not forget where we've been:

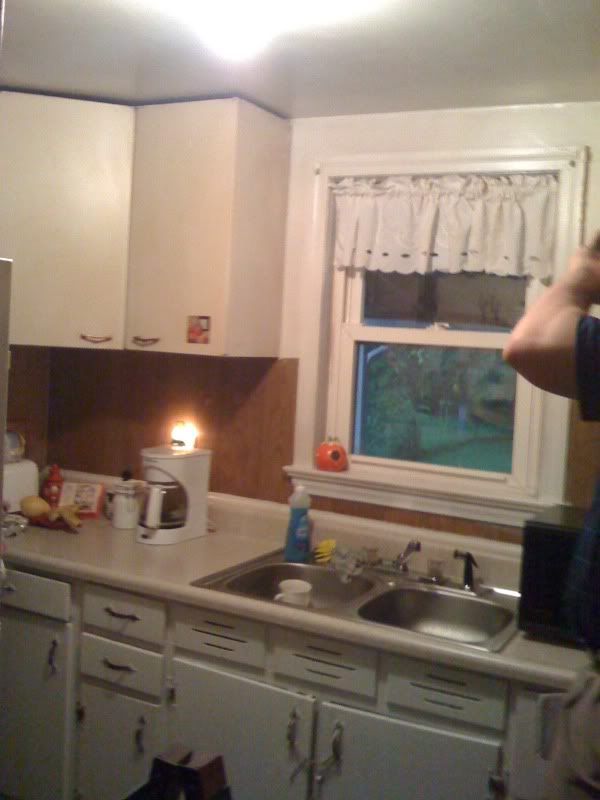
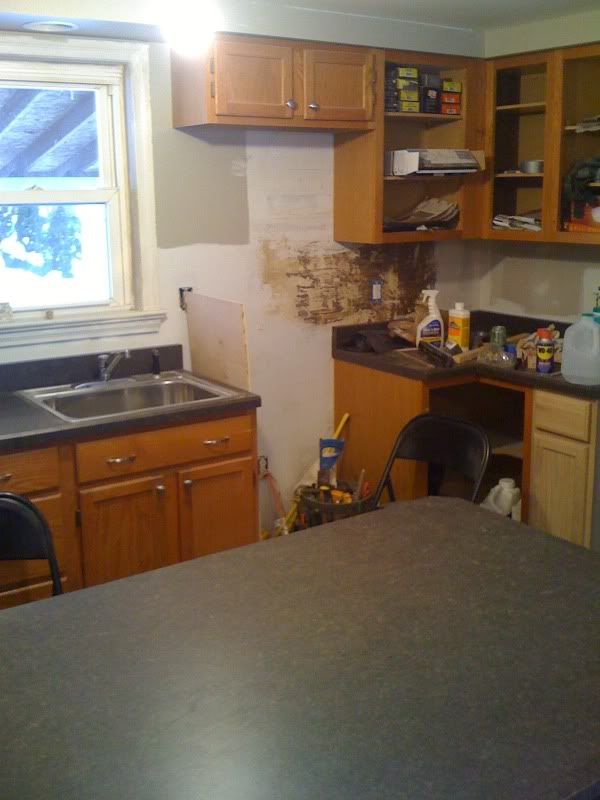
A kitchen in this bad of shape left little to be desired.


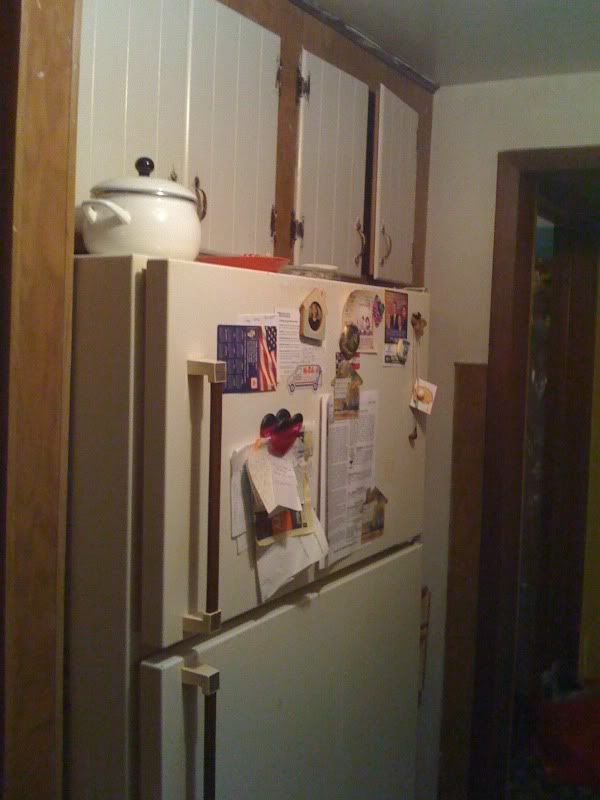
And paneling so ugly, it had to be removed.  Heck, this entire wall needed to go.


The tiny dining room seemed so dark and cramped.  That paneling wall is what's on the other side of the fridge photo above.


And carpeting in the kitchen?  Very bad.  This whole space was very bad.  The only answer was to completely gut and start over.


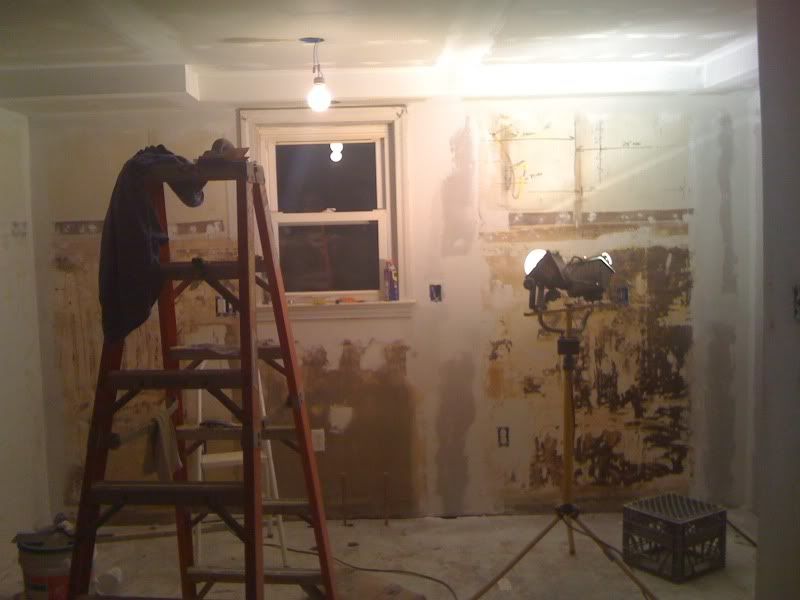
So, we got to work.  On demolition day (back in August of 2009) we started the transformation.

Goodbye paneling wall!  That's my dad getting down to business. Notice how bad the floor was under the carpeting.  We found a layer of tile under the carpet, which was applied directly on top of our hardwood with some type of tar glue.


The cabinets all came down, along with all the paneling.  (Chris' mom got in on the demolition action.)  Nice hole in the ceiling, huh?  Turns out, the previous owner had some plumbing problems in the upstairs bathroom and whoever she contracted to fix it just hammered a hole in the ceiling to access the pipes.  She patched it herself by placing cardboard from a pizza box in the hole and covering it with what we believed to be spray foam.  That was a fun discovery.  


And then, with the wall down and the paneling gone, we got to work chiseling the tile off the hardwood.  


Over the next several months, our kitchen received new drywall on both the walls and the ceiling.


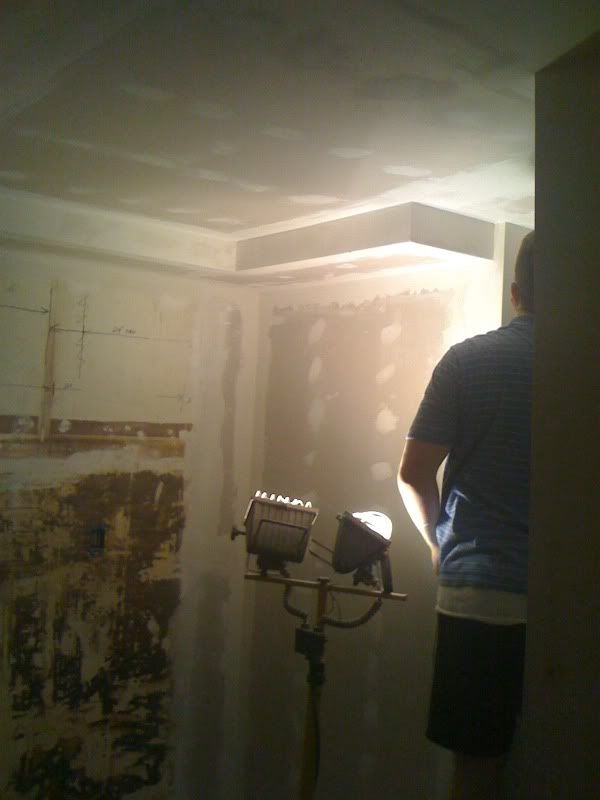
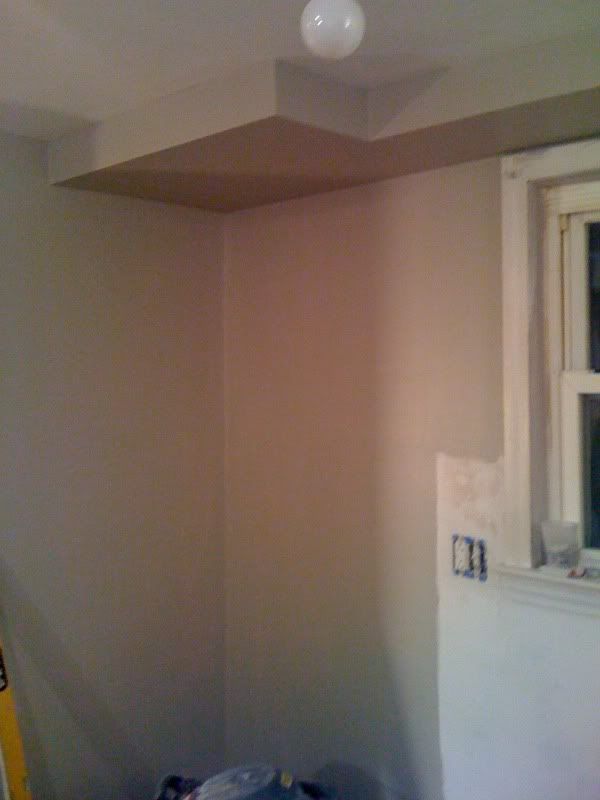
My father-in-law installed a bulkhead.


And then he started to install our cabinets and counter tops.


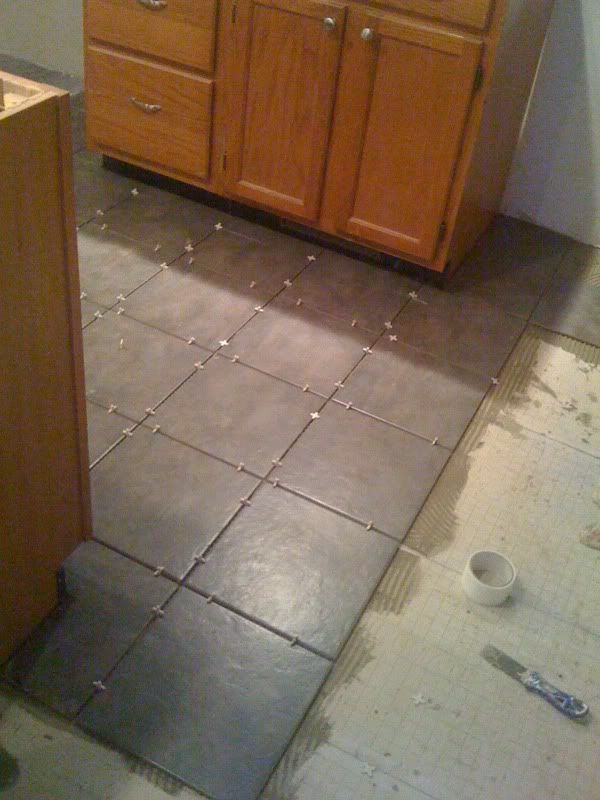
The floor in the kitchen was tiled and Chris and I sanded and refinished the hardwood in the dining area (and everywhere else in the house!)


And I got busy painting the cabinets, which were purchased on eBay.  Thanks to Edie at Life in Grace, I was inspired by how great painted cabinets can look!


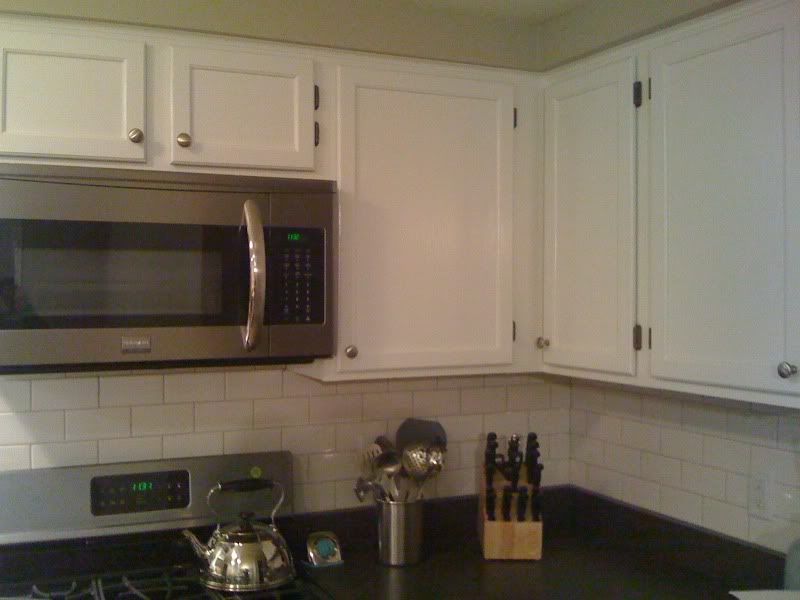
Things started to fall into place after we painted the rooms, installed subway tile and had appliances delivered.


Thanks for hanging with me!  Sorry to drag this on, but I thought you might appreciate the next series of pictures more if you saw what all was done to get it looking this way.

So, here goes!  Our ugly little kitchen was transformed into a bright, beautiful space.  We still have some more to do, but for now, I am in love!


Being that Chris & I are both tall, having a refrigerator with a bottom freezer made a lot of sense.  We love it! Having our food at eye level is super convenient.  


The subway tile turned out great!  I was a little worried about white tile with white cabinets, but I'm so happy we went this route.


Here's a close-up of the tile job.  My father-in-law did a great job.


With the wall removed between the kitchen and dining room, the space is much more open and bright.  I'm a huge fan of the poppy and aqua color combination made popular by Martha Stewart.  I really like how the white kitchen really makes the little red and blue accents pop.


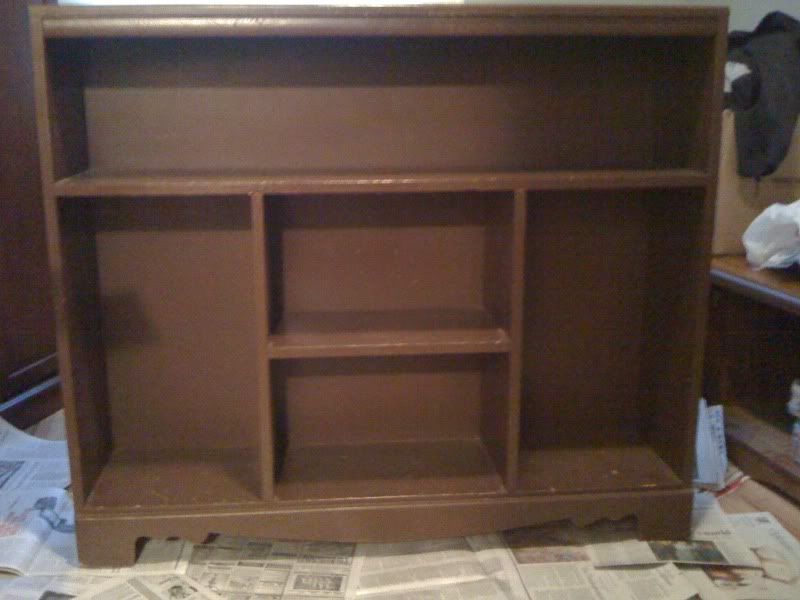
I love my little "baking center."  The shelf was purchased at Cracker Barrel, of all places.  I bought it when we stopped for breakfast on our way to Cleveland to get the eBay cabinets because I loved the color.  I'm still debating what to hang on the wall on either side of the shelf.  I may try and pick up some red-handled antique kitchen utensils. 


I hang my measuring spoons and baking utensils from the hooks on the sides.  My flower sifter is on the top and the mason jars, given to me by my mother, hold our flour, oatmeal and powdered sugar. Cupcake liners and cookie cutters are stashed in the drawer.  I keep sprinkles in the jars next to the sugar tin, which was a Hobby Lobby clearance steal at $1.80!


The cupcake print was purchased on sale at Joann's.  It came in that frame and I only paid $7.99.  I love how the colors coordinate with other decor elements in the room.


Our built-in shelf, which was a window at one point long before we owned the house, still needs a little decorative assistance.  For now, it displays my serving dishes and a few plants given to me by my sister out our open house.


Those baskets are great for hiding the little stuff I don't use very often, like our gravy boat, sugar & creamer set and some candles.


On the opposite side, I have a small shelf and a mirror made from an old window.  You can kind of see our dishwasher (black part of the peninsula counter).  I was part of the eBay kitchen and we made an offer on it while we were there removing the cabinets.  I'm so happy we have a dishwasher!  (Who wouldn't be, right?) It seems to blend in well because it's black, but one day I hope to replace it with a stainless model to match the rest of the appliances.  For now, it works and doesn't look too bad.  That's good enough for me!


The mirror was purchased at Goodwill for $5.  I bought the shelf at a yard sale for $2 and painted it.  It's the perfect size for this space and gives us some much needed storage for glassware and a couple serving pieces. This wall still needs some more decorations.


Just for the fun of it, here is the shelf before I painted it.  Paint is like a magic wand.


Here's a good shot of our light fixture, with the lights out for a better look.  It was purchased at Lowe's and installed by me.  Electric work is a little scary, but you can do it!  Just be sure to kill the circuit breaker!  The artwork in the dining area (can I call it a dining room?) is also from Joann's.


And here are our floors!  A tremendous amount of hard work was put into these, but it was worth the effort!  I'm still amazed by how good the wood looks.  I was so discouraged when we saw the tile beneath the carpet.  My dad told me the sander would make it better.  He was right!  The kitchen tile is ceramic and we chose it in a slate color to coordinate with the counters.


My kitchen makes me so happy!  Lots of cakes and cupcakes will be made here!  


We moved into our house in April.  I told you I was a big slacker with posting pictures!  Although, hanging stuff on the walls was one of the things we didn't do until last week, after deciding to host the open house.   I think that after patching so many holes, we were a little hammer shy when it came to putting any new nails in the walls.  It's amazing how hanging a framed print or some curtains can really dress up a space and make it look more finished.


Things we still have to do in this space include:
  • Find a corner hutch for the dining area
  • Add some more decorative elements for the walls and shelves
  • Finish sewing the curtains for both windows.  I bought some aqua-ish blue fabric, but ran out of time before the open house.
  • Purchase new stools and dining chairs.  The current stools were picked up by Chris' mom at a rummage sale and the dining table and chairs came from my parents' neighbors.  Er, umm...from my parents' neighbors' junk pile on neighborhood clean-up day.  Yeah, that's how we roll!


And, here's a little breakdown on some of the details:
  • Cabinets - purchased on eBay (I won the auction by 3 cents!) and painted with Ace Hardware's Cabinet and Trim paint in Contemporary White.  (This paint is amazing!  Our cabinets have a smooth, brushstroke-free finish.)
  • Appliances - All from Sears.  The fridge is LG and the stove and microwave are Frigidaire Gallery.
  • Paint - Walls are "Linen" and trim/shelves are "String of Pearls".  Both are by Valspar from Lowe's
  • Subway tile back splash and ceramic floor tile - Home Depot
  • Light fixtures - Lowe's


Thanks for checking out this extremely long and picture-heavy post!  I'm super proud of all the hard work we did and of how we were able to complete the whole project on a limited budget.  Our only splurge was the stainless appliances, and I think they were worth it!  Of course, we would never have been able to do all of this alone.  Our parents, especially Chris' dad, were amazing in helping with everything!

I'm planning on doing some posts very soon on my little vegetable garden and also on the buffet of mini desserts I put together for the open house.  So, stay tuned for yummy treats! And, of course, I'll have to get around to taking some photos of the rest of the house.  

May 27, 2010

We celebrated one year!

Monday was a momentous occasion for us----we celebrated our first wedding anniversary!  We've been through a lot in the last year.  But no matter what life gave us, we took each challenge as an opportunity to grow together in love and as a couple.  We celebrated the day by enjoying a fancy dinner at The Capital Grille in the 'Burgh and then went home to enjoy the top tier of our wedding cake.


For those of you that don't know, my sister and I made my wedding cake.  It was a hybrid of real and fake tiers with sheet cakes being served from the kitchen.  Our top tier was a decorated cake dummy.  In order for us to do the traditional wedding cake sampling on our anniversary, I had to make a replica of our cake as a substitute for the fake one.


Here's how it turned out:
Courtesy of my iPhone---sorry for the poor lighting.
And, for comparison sake,  a shot of the original:

At the request of my Mr., the anniversary cake was fondant-covered carrot cake with cream cheese frosting and filling.  It was yummy!   I tweaked the recipe I've used in the past and swapped out some of the fresh grated carrots for a few jars of carrot baby food.  This intensified the flavor and made it very moist.   I was really impressed with how it tasted.


I know some couples enjoy eating their frozen tier, but fresh-baked cake is better than frozen any day.   Ours was delicious!


Here is the recipe, in case any of you are interested:


CAKE:
  •   2 1/2 cups  all-purpose flour
  •   2 tsp. baking soda
  •   1/2 tsp.  ground cinnamon
  •   1/8 tsp.  ground allspice
  •   1/2 ts salt
  •   2 cups  sugar
  •   1 cup  vegetable oil
  •   2 lg eggs; at room temperature
  •   2 tsp. vanilla extract
  •   3 cups grated carrots (swapped with four 4-ounce jars carrot baby food)
  •   One 8-ounce can crushed pineapple; well drained
  •   3/4 cups  chopped walnuts (I omit these because I don't like them)
  •   1/2 cup raisins
FROSTING:     
  •  8 ounces cream cheese; at room temperature
  •  4 tbsp. (1/2 stick)  butter; at room temperature
  •  1 tbsp. half-and-half or milk
  •  1/2 tsp. almond extract
  •  1/2 tsp. vanilla extract
  •  4 cups  confectioners' sugar   (1 pound)
Directions

To make the cake: 
Preheat the oven to 350 degrees. Lightly butter and flour a 13 x 9-inch baking pan, tapping out the excess flour. Sift the flour,baking soda, cinnamon, allspice, and salt together and set aside. In a large bowl, using an electric mixer at high speed, beat the sugar, oil, eggs, and vanilla until well combined, about 1 minute. Mix in the carrot baby food. With the mixer on low speed, beat in the flour mixture, scraping down the sides of the bowl as needed, and mix until smooth. Using a wooden spoon, stir in the pineapple, chopped walnuts, and raisins. Spread evenly in the prepared pan.


Bake until the top springs back when pressed lightly in the center, about 1 hour. Cool completely in the pan on a wire cake rack.

To make the frosting: 


In a medium bowl, using an electric mixer at medium speed, beat the cream cheese, butter, half-and-half, and almond and vanilla extracts until smooth, scraping down the sides of the bowl with a rubber spatula. With the mixer on low speed, gradually beat in the confectioners' sugar.

Spread the frosting over the top of the cake. Cut into 15 pieces. If desired, garnish each piece of cake with a walnut half.

Copy Cat Pizza Hut

Sometimes you can't imitate an original, but sometimes you can---and it turns out tasting very yummy!


The other day, I made copy cat Pizza Hut Pan Pizza and I was thrilled with the results!


Here is the recipe I used.

From cdkitchen:

Pizza Hut Original Pan Pizza Recipe

Ready in: 1-2 hrs
Serves/Makes:   4

Ingredients:
1 1/3 cup Warm water (105F)
1/4 cup Non-fat dry milk
1/2 teaspoon Salt
4 cups Flour
1 tablespoon Sugar
1 pk. Dry yeast
2 tablespoons Vegetable oil (for dough)
9 ounces Vegetable oil (3 oz. per pan)
Butter flavored Pam


Directions:
Put yeast, sugar, salt, and dry milk in a large (2 qt.) bowl. Add water and stir to mix well. Allow to sit for two minutes. Add oil and stir again. Add flour and stir until dough forms and flour is absorbed. Turn out on to a flat surface and knead for about 10 minutes. Divide dough into three balls. In three 9" cake pans, put 3 Oz. of oil in each making sure it is spread evenly. Using a rolling pin, roll out each dough ball to about a 9" circle. Place in cake pans. Spray the outer edge of dough with Pam. Cover with a plate. Place in warm area and allow to rise for 1 to 1 1/2 hours. 
For Each Nine Inch Pizza: 
1. Preheat oven to 475F 

2. Spoon 1/3 cup sauce on dough and spread to within 1" of edge. 


3. Distribute 1 1/2 Oz. shredded mozzarella cheese on sauce. 


4. Place toppings of your choice in this order: Pepperoni or Ham Vegetables Meats (cooked ground sausage or beef) 


5. Top with 3 Oz. mozzarella cheese 


6. Cook until cheese is bubbling and outer crust is brown.


If you click on the link above for the recipe, you can get the details on making the sauce.  I just used a bottle of store bought.  (I am lazy!)


I swapped some of the flour for whole wheat (about 1.5 cups) to make it a little healthier.  I used two 8" cake pans on one 10" pan because that is what I had on hand and I used way less oil to coat them than the recipe calls for.  The pizza did take a little bit of a time investment with all the kneading and rising, but it was worth it.  We both really enjoyed this recipe!


April 22, 2010

Kitchen Sneak Peek!

It's been a rough few days, so I thought I'd share a little sneak peek of our kitchen.  Sharing cheers me up!  I have a few more little things to do in here before I take some more pictures.  I hope this iPhone photo isn't too dark.


Cabinets, purchased used from ebay, are painted white with Ace Hardware's Cabinet, Door and Trim Paint
Subway tile is from Home Depot
Everything on the counter is from the Martha Stewart Collection at Macy's

April 20, 2010

Setbacks

Setbacks suck.  And we've had our share of them during operation house rehab.  Saturday morning, we were gearing up for a day-long wait for the cable company to FINALLY, between the hours of 8:00 and 4:00, install our cable and internet. (oh, how I've missed you internet!)  I really wanted pancakes and I really wanted to make them on our new electric griddle.  The griddle was in the basement on the storage shelf, so down the stairs I went.

The crummy part of this story starts when I tell you I sleepily took that last step down and found my foot in four inches of water.  Lucky us.  We hit the sewage water line backup lottery two weeks after moving in.  What a crappy way to start our Saturday.  Thankfully, the backup was in a clean water sewage pipe and did not cause our actually sewage to fill our basement.  Just water.  Lots and lots of water.

We were assessing the damage and calling in reinforcements by the time the cable guy showed up.  When does a cable guy ever show up at 8:00 am when they give you an eight hour window?  Just our luck again, right?  He initially said the install would not be a problem.  He only had to check the wires in the basement and he was wearing waterproof shoes.  Twenty minutes later, he tells us his supervisor recommends he not do the work because of the water.  Fair enough, cable guy.  But if you wouldn't have arrived on time (as is your reputation) we'd have time to get rid of the water before you got there.

Anyway, the reinforcements came by way of a well-connected brother-in-law with a drain cleaning snake he borrowed from a plumber he knows.  After a few minutes of running the machine, the clog was found (old rag from who knows what decade) and the water receded.

Our Saturday of painting the hallways and various doors throughout the house turned into a day of  sorting through the wet mess that was all the junk in our basement.  We were really lucky to have very little damage to the contents of the basement.  Most of the items down there were building materials from the remodel just waiting for a dumpster rental.  Our washer and dryer are on a higher-sloped part of the floor, so they only got about two inches of water---not enough to do anything because they were sitting on small blocks.  We ended up clearing out the entire basement and moving it to the garage.  We had been planning to clean all of this eventually, so I guess being forced to do it earlier than planned isn't all that bad.  We are hoping to get a dumpster in the next week or two so all of this stuff can be out of our way for good.

Setbacks still suck, whether they mess you up for a month or for a day, or whether they cost you thousands or nothing.  On a scale of one to ten, this one would probably be an eight--minimal damage and cost, but several straight hours of hard work.

Oh.  And I never did get those pancakes.

April 15, 2010

Favorites

We've been busy settling into the house and tackling the remaining improvement projects.  While I'm jumping right into the housekeeping and homemaking, there are ten products that I absolutely love and want to share with all of you.

1. The Shark 2-in-1 Cordless Stick Vac and Handheld Vacuum Cleaner.  We have hardwood or tile floors throughout the house and have low-pile area and accent rugs here and there.  Since we don't have pets or kids, we didn't really see the need for a big, cumbersome vacuum cleaner.  I wanted something lightweight, cordless and capable of sucking the dirt off our our floors and the Shark 2-in-1 works perfectly.


I like how I can vacuum the whole house on one charge and how it is great for quick pick-ups here and there.  I also like the conversion to a hand-held vacuum.  It's not the easiest conversion, but it works fine and does it's job.  For the money, this vacuum is so much better than the old broom and dust pan.


2. Gold Canyon Candles.  A few years ago, my mom, sisters and  I went to a candle party where I reluctantly purchased two small candles due to the guilt one gets from attending a home candle party.  I was skeptical, but when I received them I was surprised by how clean they burned and how great they smelled.  I like them so much that I was hesitant to burn them more for fear of using them completely before I could order more.  That same year, I held a candle party of my own right before Christmas and earned about $250 in free products.  (It was the demonstrator's best party to date.)  Fast forward and now one of my sisters is a demonstrator and my family has turned into candle snobs.  If it's not Gold Canyon, we aren't buying or burning it.  They are a better product and better value than Yankee and PartyLite and they come in a wide variety of delicious scents.

My most recent purchase was Grass.  This candle is spring in a jar.  It smells so good and so much like a fresh-mowed lawn. Love it!

The company also sells great candle holders and care products.  Their wick trimmer is a must for any candle lover---seriously, go buy one!


3.  Gold Canyon's Homeology Cleaning Products.  After professing my love for their candles, how could I not profess my love for their line of plant-based cleaning products.  My favorite is the floor cleaner because it smells amazing and it makes our hardwood floors look so shiny.  I just spray it directly on the floor and then use a Swiffer with a dry cloth to "mop."


The all purpose and glass cleaner also have nice fragrances and work wonders.  I just purchased the all natural cleanser (it is similar to Comet, but smells way better and is plant based.)  The products are a little on the pricey side compared to other cleaning products, but they last a long time and are green.  Purchase from my sister's site here.

4. Martha Stewart Collection 6-Piece Multi-Colored Melamine Bowl Set.  Who ever though mixing bowls could be so fun?  I received these as a wedding shower gift, but they came from Macy's.  I love the colors, the sizes and how easy they are to clean.  These bowls make my kitchen happy.


5. Potato Peeler.  I don't know the proper name or brand for this, but I got it as a shower gift from a cousin who works at the Kitchen Collection.  I'm not a huge fan of peeling potatoes, but doing the deed with this little guy made it more enjoyable.  I mean, how can you not smile a little when you use this little guy to peel the spuds?  I even received a matching potato brush--too cute!


6. Hamilton Beach Smiley Mixing Spoons.  Again, got these as a shower gift and they came from the Kitchen Collection.  They are literally my happy spoons. (and I refer to them as such.)  They are fun, colorful and I like them.  That's enough for me!


7. Scroll Banana Hanger.  I purchased this functional and decorative item at Kohl's.  The Mr. really wanted one and this one looked pretty, so I bought it.  It keeps our bananas fresh and yellow longer. It also helps to keep the bananas in view so we eat them.  We can put a big bunch of bananas on this thing and they'll stay good for about a week.  Setting them on the counter could never give us the same result.


8.  Bounty Quilted Napkins.  The Mr. is a paper towel waster.  This is a tough habit to break him of because he uses paper towels for everything.  I found that buying cheaper paper towels just meant that he would used more than one at a time.  I've decided that, despite the price, Bounty paper towels are necessary.  While shopping in the paper goods aisle at Giant Eagle the other day, I found Bounty Quilted Napkins on sale, so I picked up two packages.
These napkins are basically folded paper towels, but they are cheaper per sheet and effective enough for a paper-towel-loving husband to use for little spills without wasting the paper towels.  I'm still working on getting him to use dish towels to clean up water splashes and to dry plates and pans, but until then, the napkins are an economical stepping stone.


9. Plain Jane White Dinner Plates.  I don't remember what brand ours our (they were a wedding gift) but they are just your basic rimmed white plates. They are classic and will never go out of style.  I love how colorful and appetizing our food looks when we use them and it's an added bonus that they go with everything.  I'm looking forward to how they'll adapt to different holiday decor ideas.  They provide a clean canvas for tablescapes and dining room decorations.  I love them!


10.  Fire King Jadite Mixing Bowl.  I purchased my mixing bowl at a flea market last summer and it is, by far, my most favorite thing in my kitchen.  I have always loved Jadite, but never bought any before.  When I saw this bowl, I new it had to be mine.  Thus, the collection began.  One day, I will have cupboards filled with Jadite plates and bowls and will serve dinner on them daily.  I would love to have a display of unique kitchen serverware and containers made of Jadite.  So far, Etsy and ebay have been my go-to places to search for great additions for my collection.  This bowl is my favorite piece so far and I love that I can use it for everyday mixing and serving.  (The Mr. likes to use it as a popcorn bowl.)


So, now that you've seen my list, what are some of your favorite things to use around the house?


Full disclosure:  I have not been compensated in any way to review or promote the products mentioned above.

LinkWithin

Related Posts with Thumbnails