December 22, 2009

Easy Hostess Gift

My office Christmas party was at my boss' house this year and I didn't want to show up empty handed.  I don't like to bring wine since I don't really drink it myself, or know what kinds are good, so I decided to put together a  hostess gift that was a little more my style---a cupcake pan candy buffet.

Here is what you need:
  • One cupcake/muffin pan (Mine had 12 cups)
  • Cupcake liners (12)
  • 12 different candy varieties
  • Shrink wrap bag
  • Twist tie
  • Ribbon
  • Small decoration or Christmas ornament

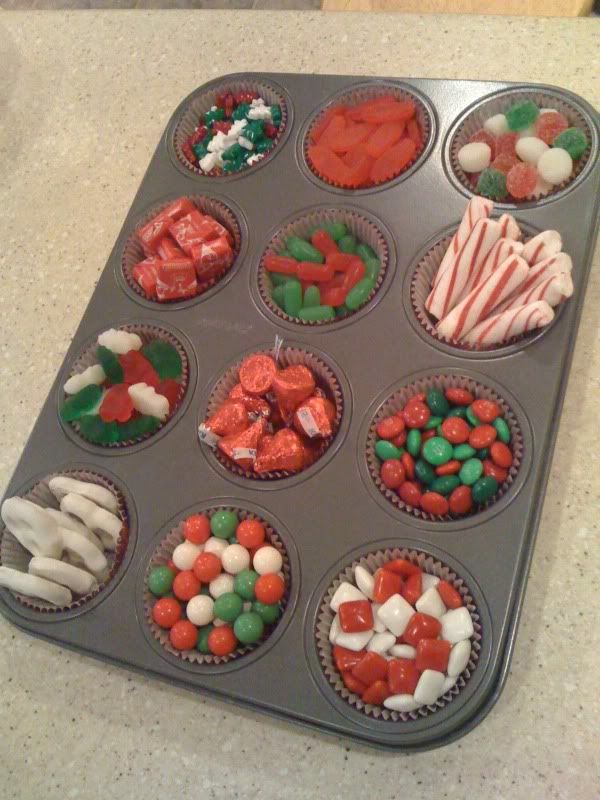
1.  Place a liner in each of your cupcake pan cups.

2.  Fill each cup just to the top with a different type of candy.


3.  Place the pan in a shrink wrap bag and gather it at a side or near the top.  Secure with a twist tie.


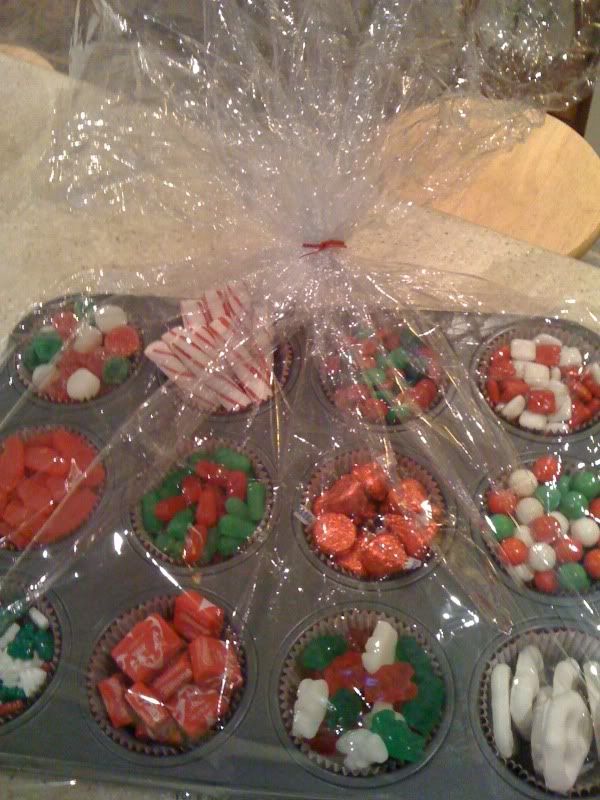
4.  Use a hair dryer or heat gun to shrink the bag loosely around the candy, being careful not to melt any chocolate. This takes away the excess plastic without getting it so close that the bag melts into the candy.


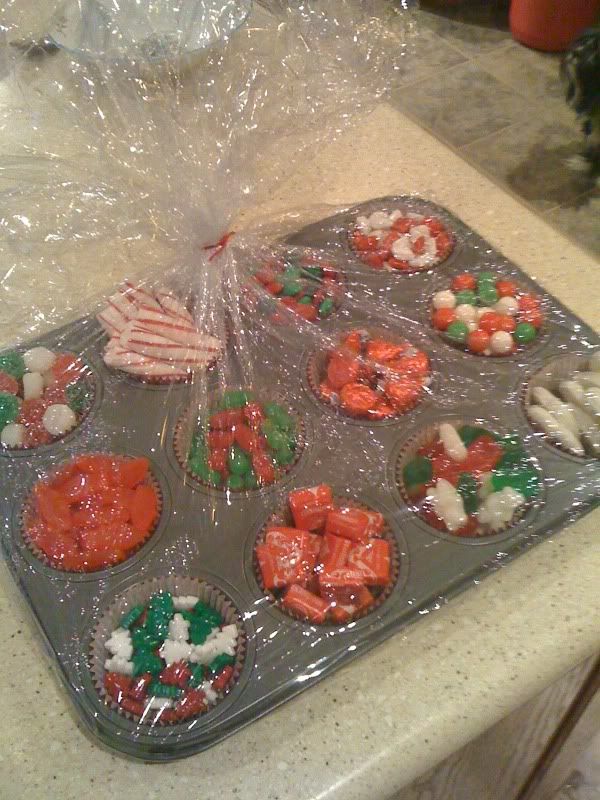
5.  Use ribbon to tie on a bow.  Add a Christmas ornament to dress it up.


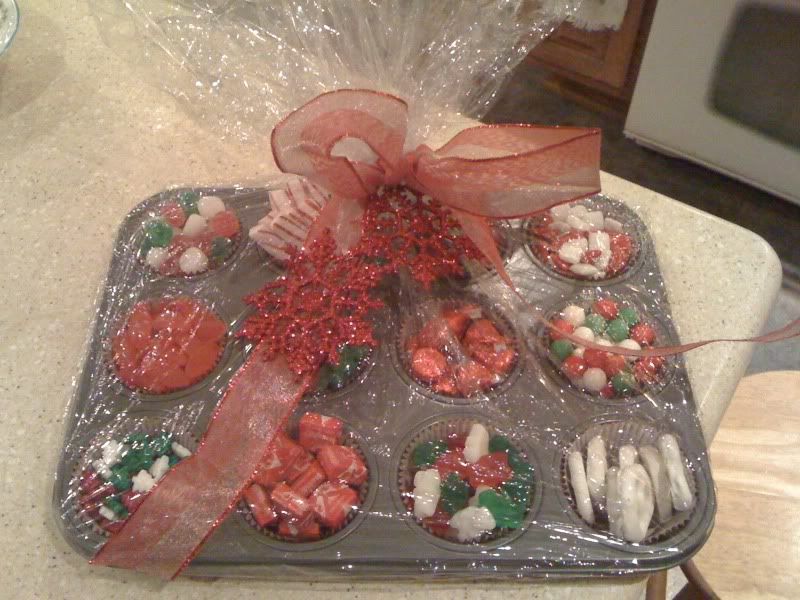
And there you have it!  A quick and easy gift any hostess would love to receive!


Tips:
  • Check out the bulk candy section of your local grocery store to get just the right amount of candy for each cup without having to buy larger, prepackaged bags.  This is also great for buying specific colors.  I was able to pick out red, green and white candies from a bin with lots of different colors.
  • The Christmas candy aisle at Walmart had a great selection of stocking stuffer sized candies in Christmas colors.  I was able to pick up a few varieties and they were a decent amount for filling the cups.
  • I used Christmas colored candies, but this can be altered for other holidays by changing the colors or the contents.
  • I purchased a nice pan at Target for about $7.00.  I figured it was worth it since, if making a gift basket, the price for a basket would be about the same, and I know that the recipient would be able to use the pan confidently for making muffins or cupcakes later on. (or, I didn't want the pan to sell at their next yard sale, if you know what I mean.)
Here are the candies I used:
  1. Red, white & green Gummy Bears
  2. Red, white & green Sugared Gummy Dots 
  3. Hershey Kisses
  4. Red Swedish Fish
  5. Red, white & green Gobstoppers
  6. Mini Peppermint Sticks
  7. White chocolate covered pretzels
  8. Red Starbursts
  9. Red and White Chiclets Gum
  10. Red & green  M&M's
  11. Red, white & green Christmas Star Candies
  12. Red & green Mike 'n' Ike's
I think the total cost for putting this together was about $20 - $25 and I had a little bit of candy left over.  I'm not sure what a good bottle of wine would cost, but I would guess you'd spend about the same.

I really loved how this turned out and it was very well received!  What do you usually bring to parties as a hostess gift?


DIY Day @ ASPTL

December 16, 2009

More fun with Polyvore

I couldn't help myself.  Once I started to play around with Polyvore, I just couldn't stop dreaming up inspiration boards for our house.  Here is what I envision for the downstairs rooms.

The Living Room:
Linen Living Room
I'm thinking neutral, linen-like colors for this room.  It will be a serene place where we can relax, read and cuddle up to watch a movie.  I am really liking silvery-blue shades and variations of turquoise as accent colors, but I like how easily other colors, like olive green or rich reds could be used to mix it up a bit.

The Dining Room:

With the dining room sharing a wall with the living room, I was thinking that I might be best to carry the same color palette into this room, but play up the blue hues more and add some dark brown and pewter accents.  I really think this room will need a mirror to help make it seam bigger and I want to get an area rug and long to-the-floor curtains to make the space seem a little more formal.  We have an oak table, which I wouldn't mind covering with a coat or two of creamy white paint.  We also need to pick up some new chairs, preferably ones that are upholstered.

The Kitchen::

Of course, I want to have a super retro kitchen, but this just won't work given our house, appliances and, well, reality.  Although, I still want to incorporate some retro-inspired item, like the glass jars in the board, some old, red kitchen utensils and some fun dishtowels and accessories.  The kitchen shares space (and a walls) with the dining area, so I want it to blend well, but also allow for a little punch of color.  And, with white cabinets and a linen-colored wall, the color is going to come through the accessories and some of my kitchen tools.

I'm sure my ideas will change a few times before we get settled in, but it is way to much fun to create these boards.

December 10, 2009

Dreaming of when it's all done

We are so close to having our upstairs bedrooms painted and ready for move-in.  The downstairs, with the exception of the kitchen, needs a complete paint job and the floors all need to be refinished.  It feels so good to see the light at the end of the tunnel when it comes to completing the bulk of our renovations.

I've been thinking up some ideas for the decor in each of the rooms.  This is so difficult because we have lots of hand-me-down and flea market furniture to work with when putting together a home environment we love.  I'm going to do my best to slip cover, paint and modify where possible to make everything look like it belongs.  This is going to be quite the challenge!

For our Office/Craft room, we already have dark furniture.  I would like to pick up a narrow table for use as a crafting/sewing desk and we'll need some book shelves or an armoire for storage.  Here is a little inspiration board I put together for the space on Polyvore:


Visualizing some ideas for the room is a big help. I also decided to put together an inspiration board for our bedroom:


I worked in a picture of our actual bedding set and ceiling light fixture we purchased.  I have a dark brown bird cage/candle holder I can use in this room and I am considering DIYing an upholstered headboard.  I just don't know if a tufted or simplistic look like the one in the top left photo.

And, why not give it a shot for the other bedroom with the soft meadow green walls.  I decided to play around with white and linen colors in this board.  Here is how it turned out:

Green and Linen Shabby Bedroom


It seems that the more I worked on my Polyvore boards, I think I got better at putting them together.  The last one is my favorite!  That room might actually be something I could pull off.  I'm pretty sure I still have a white down comforter somewhere in size full/queen (perfect!), I could easily whip up some linen accent pillows and sew linen trim onto white sheets, and I could paint one of our dressers in the off-white, linen-like shade.  I also think we have an old rustic window in our garage that I could paint, distress and hang on the wall.

Yeah, it was fun dreaming up ideas for these rooms.  It will be even more fun when we get to start putting stuff in them!

December 9, 2009

Floor Refinishing -- The Sanding

My dad bought a floor sander at an auction for $5 a while back.  He used it to sand down some of the floors in their house, and now we are using it on our hardwood.  With daily rental for one of these babies running at about $85, we are really saving by using my dad's!  And the best part is that we can sand floors when we need/want to and take our time since there's no rush to return.

I purchased the sandpaper from a local equipment rental company.  The heavier grit ran almost $4 a sheet, while the finer grits were between $1-$2.

Dad brought the machine over to tackle the worst floor---our dining room.  If you recall, the floor was carpeted when we bought the house.  When we pulled up the carpet, we found a tile and tar on top of the hardwood.  We chipped it up the best we could, but lots of tar remained.

After two passes with the heaviest grit, our floor started to look much better!


My dad showed Chris how to work the equipment.  He got the hang of it pretty quickly!


And here's my dad changing the sandpaper.  We went through a few sheets just trying to remove the tar.


Clean up!


The results were amazing!


Of course, the sander couldn't reach all the way to the edges, so we will have to rent an edge sander.  But, wow!  Look at the difference!  I am impressed with the results!  It looks so nice and new where we sanded.  We are going to wait until we are finished with all plaster repairs and painting before we stain and varnish the floor.  We would also like to sand the floor in the living room, as well, before we do any finishing.

I'm excited about this!  Looks like our hopes of having beautiful hardwood floors is going to become a reality!  I can't wait to see how it looks once we stain.


December 5, 2009

Kitchen progress

While we've been busy painting the bedrooms upstairs, my father-in-law has been busy with the kitchen improvements.

To recap, we removed the old metal and birch cabinets, removed a wall, took out a closet in the living room to expand the width of the area, did a complete overhaul of the plumbing and electric and purchased cabinets used on ebay.

With the plumbing replacement, some of the wall plaster and the entire ceiling in the kitchen had to be torn down.  New drywall has been installed there and the patching process has begun.  He also built a new wall where we removed the closet.  One of the coolest and most unexpected additions to the kitchen has been the bulkhead above where the cabinets will go.  He put this in to eliminate an area that would only be good for collecting dust.  We won't be able to use any crown molding on top of the cabinets now, but I think the bulkhead will give it a nice, professionally-finished look.  And, it will give us a little bit of wall space we can paint for an added pop of color in the room. (I also have visions of getting a wall cling with a cute saying from somewhere like Uppercase Living---maybe this one?)

Again, crappy iPhone photos, but you can see the 6-inch bulkhead at the top of the wall:


Yeah, the area looks a little scary right now, but the base and wall cabinets, appliances and tiled back splash will cover all of the ugly parts. The ugliness is the result of wood paneling attached with liquid nails.


This is the new wall where the closet once was.


Oh, and he even put in a recessed light above the sink and two above where the peninsula will go. (It will separate the kitchen from the dining room and house the dishwasher.)


We've been patching and sanding for the last few days.  Basically, we have to get this prepped, primed and painted before Chris' dad can do anything with the cabinet and appliance installation.

We still need to buy three more cabinets from Lowe's to match our used set, a fridge, the tile for the back splash and floor, the counters and possibly a new stove.

December 4, 2009

What was once scary yellow is now a peaceful shade of green

Next on our to do list was the scary, school bus yellow bedroom.  While the cigarette damage wasn't as bad in this room, covering the bright colored wall presented a challenge.  We knew our problem was no match for Kilz and primed that obnoxious room with their Premium product, a primer designed to both block stains and hide colors.  It's also good for mildew-prone areas, but we were more interested in its ability to cover up the hideous paint colors left for us by the previous owner.


So, here we go.  Scary yellow wall before primer:


(Yes, there were that many holes and imperfections in this wall.  We had to do a lot of patching)


Scary yellow wall during the priming:


And no more scary yellow wall!


Now, with a blank slate, we began brainstorming on a color for the wall.  Since this room will be our guest bedroom, we wanted to make it a peaceful and serene color that was anything be the yellow it once was.  After looking at what seemed like hundreds of paint chips, we decided on Glidden's Soft Meadow:


And, I think it looks wonderful!


And with the trim painted in Behr's Traditional:


The room looks about a million times better and I can't wait to start putting stuff in here.  We probably aren't going to refinish the hardwood floor in this room because, between furniture and area rugs, most of it isn't going to show.  And, outside of a few pink paint splotches, the floor is in decent shape.

It is so nice to be done painting in at least one of the rooms!  Yay for progress!


December 3, 2009

Painting our house (or making the bad stuff disappear)

Yes, I know posting has been very light lately.  I guess you could say our renovations have been a little less talk and a lot more action for the month of November.  We have been very busy painting. VERY busy painting.

We started in the smallest bedroom.  As of now, we plan on using this room for an office, but it will probably be converted to a nursery whenever we get around to having children.  This room also had the most noticeable cigarette smoke damage of all the rooms.  The walls and ceiling were a slight off-white when we scrubbed them down, but the smoke made them more of a light brown.  It was pretty gross!

We wanted to be sure the discoloration was completely covered by primer before we painted.  And with the amount of smoke damage, we pulled out the big guns to get the job done.


We purchased Kilz Complete because it promised to provide excellent adhesion, hide imperfections and block smoke and nicotine stains on walls.  Just what we needed!  It's an oil-based primer, so it was really thick, smelled really bad and was a pain in the butt to clean up. But, it was worth it!  It did exactly what we wanted it to do.  This stuff really works!


Here is a picture of the room when we just started to prime it.  Since the primer is super bright white, you get the idea of  exactly how nasty the cigarette smoke stains were.  Oh, and  we cleaned it some with soapy water before painting.

The ceiling:


(See?  I told you it was nasty!)


And the walls:


The happy face of progress:


Yes, I was a little to excited to have progress I could actually see.  And to see all of the bad stuff disappear.

Chris is happy to see the bad stuff go away, too!


We ended up going back and priming the trim. (That was not part of the original plan.)  Using this space for an office and possibly a craft room made us want to pick a more energizing and creative color for the room without going too nuts. We wanted something with a little more darker color than what we picked for the other bedrooms on the second floor, but not too dark because of the small size of the room.

We settled on Glidden's Antique Silver.  A nice grayish-blue that would be dark enough to be noticeable without being obnoxious.


And here's the room after we put the color on the walls:


I guess my iPhone doesn't really take the best pictures, but for now, this will have to do.  The color is a little darker than it appears in the pictures.

I really like how it turned out!  I think the dark brown trim will look great and the dark stained office furniture we already have (thank you, The Price is Right!) will fit right in.  The floor will need to be sanded down and refinished in this room thanks to some very bad pet stains.  We'll be painting the trim this weekend and then we'll get started on the floors.  The work never ends!

November 17, 2009

Our Bedroom

We've been making some progress in the bedrooms and I'm most excited about our master bedroom! We primed the walls and ceiling last night and will begin painting them soon. We purchased two gallons of ceiling paint in Glidden's Parchment White, so we will be using this color throughout the upstairs ceilings (and possibly downstairs, as well)


For the wall paint, we decided on Glidden's Navajo Sand. I like this creamy beige color will bring out the lighter colors in our bedding. And, it's a relatively neutral color that will go well with other bedding sets when we decide to make a change later on.


What bedding did we pick? Canyon Crest's Grand Paisley.


OK, so this picture doesn't really help much because it is a bit lighter in person.  The best part about this bedding set is that it is a complete room in a bag.  Not only do we get the comforter, sheets, pillowcases, shams, dust ruffle and decorative pillows, but we also get two valances and four curtain panels. I love how I don't have to find coordinating fabrics for the curtains or pillows.  I think this set will help make the master bedroom come together quickly and perfectly.  The entire 24-piece set was a bridal shower gift.

The room is on the small side (14x11) so we won't have much room for anything but our nightstands and our king-size bed. I'm OK with that.  I never really liked having a TV in the bedroom (not good for getting a decent rest) and our closet should be big enough to hold our clothes.  We may have room for a highboy, but I'm not counting on it.  The larger bed is much more important to us (and our sleep) than vanities and large dressers.

Trim and doors in the room will be painted Behr's Sweet Georgia Brown.


Third one down.

So, those are our color choices.  I can't wait to get the wall painted and see how it all looks together with the bedding and our light fixture!

November 1, 2009

Let there be light

We had to pick up two recessed lighting units for our kitchen, so when we popped in to Lowe's to check out the options, we also found some suitable light fixtures for other areas in our home.

For our bedroom, we currently have a ceiling fan.  I have some weird fear of having ceiling fans over my bed, so Chris indulged my wish to swap it out and we picked up a semi-flush mount fixture to coordinate with our bedding.


Since our ceilings are on the low side, we liked that this one had a little bit of visual interest without hanging down too far into the living space.

For the other two upstairs bedrooms, we picked up a 2-pack of inexpensive flush mount fixtures.  They are the same style as this one, but in a brushed nickel finish.


For our downstairs bathroom, we decided on a bar-style vanity light.  We don't have a lot of wall space, so the three-bulb fixture will fit nicely.


We are planning on using frosted, soft white bulbs.

And, even though we bought these a while ago while picking out other items for the upstairs bathroom, here are the fixtures we purchased for the upstairs bathroom.

 This vanity light:


With these alabaster bell glasses:


And this overhead fixture with built-in ventilation:


I love how you can't even tell this is a fan light by the looks of it.  It runs very quietly, too!

So, that's what we've decided on so far.  We thought about purchasing the dining room and kitchen overhead lights, but we decided to wait until we knew where our table would sit.  If space issues don't allow us to put it in the center of the room, we don't want a chandelier hanging from the middle of the ceiling.  And, since the dining room is open to the kitchen, we want the fixtures to coordinate.

For the price and the style, we will probably purchase another 2-pack (both lights are just $19.99!) in brushed nickel for the downstairs bedroom and bathroom overhead lights.  Our living room will be light with lamps, so we'll choose those once we pick out the furniture.

Weird, but picking out light fixtures gets me a little excited.  It means we are one step closer to moving in!


October 27, 2009

What's Cookin'?

Chicken Alfredo Biscuit Casserole, that's what!  I made this for dinner last night and it was a hit with Chris. (and me!) It was very, very yummy and I'll be sure to add this to the regular rotation.


The recipe if from Pillsbury's Web site. I was in to mood for some chicken and biscuits, so I did some internet searching to find a decent recipe.  An Alfredo dish wasn't quite what I originally had in mind, but when I saw the recipe, I knew I had to give it a try.

Here's the recipe from Pillsbury:


Chicken Alfredo Biscuit Casserole


Parmesan-crusted biscuits top this mouthwatering chicken Alfredo casserole that is sure to become a family standby.
Prep Time:
15 Min
Total Time:
35 Min
Makes:
5 servings
INGREDIENTS
1tablespoon butter
2cups sliced fresh mushrooms
1/2cup chopped onion
1jar (16 oz) Alfredo pasta sauce
1/4cup milk
2cups chopped cooked chicken
2cups Green Giant® SELECT® frozen broccoli florets, thawed
1/4teaspoon dried basil leaves
1can (7.5 oz) Pillsbury® refrigerated buttermilk biscuits
1tablespoon butter, melted
1tablespoon grated Parmesan cheese
DIRECTIONS

1.Heat oven to 375°F. Spray 8-inch square (2-quart) glass baking dish with cooking spray.
2.In 10-inch nonstick skillet, melt 1 tablespoon butter over medium heat. Cook mushrooms and onion in butter, stirring occasionally, about 5 minutes or until tender. Stir in Alfredo sauce, milk, chicken, broccoli and basil. Cook until mixture is thoroughly heated and bubbly, stirring constantly. Spoon into baking dish.
3.Separate dough into 10 biscuits. Cut each biscuit in half crosswise. Arrange around edge of baking dish, overlapping slightly. Drizzle biscuits with melted butter; sprinkle with Parmesan cheese.
4.Bake 15 to 20 minutes or until biscuits are golden brown.

This is one of those comfort-food type recipes and it's great for whipping up for a quick, but home-cooked tasting meal.  I skipped the basil and added a few shakes of parsley flakes to the top for garnish.


When I do this again, I will probably take off a few layers of the biscuits before baking (I used Grands) because their thickness left them a little doughy.  I didn't want to bake them any longer for fear of burning the tops. (It was in the oven for 20 minutes.)  Personally, I didn't mind the extra doughy-ness, but I'm not sure about others eating it and feeling the same way.


I love casseroles, especially when they are a complete meal.  And this was very easy.  It looked great, tasted great and filled the kitchen with a yummy smell.  All around yummy!  Thanks, Pillsbury!

October 21, 2009

Hole-y Moly!

One of the surprises that came with buying our home was when we discovered there was no insulation in the walls of the house.  Although it has a solid brick exterior, we were worried about how the lack of insulation would impact our home heating costs over the winter.

We got some quotes on getting the insulation blown in and were then surprised by the costs.  Spending almost $3K was not part of our home renovation budget and we wondered if the energy savings would ever pay off if we only stay in the house for 5-10 years.

We were able to work out a deal with an insulation professional to get it done for a much more reasonable price if we did some of the work ourselves, so we went for it.

Because of the brick exterior, our option for getting the insulation blown in was to drill holes on the interior of the house between every stud on exterior walls.  The bit we used was a 2-inch carbide hole saw bit and Chris went to town turning out walls into swiss cheese.  Actually, it wasn't as bad as I thought it would be.  The holes were drilled towards the top of the wall for the majority of the studs.  He had to drill holes closer the the bottom of the wall where there were windows.


Chris working hard, drilling the holes.


Holes at the top.


Holes in the master bedroom.


This is the big truck in our driveway.  This housed the bags of insulation and the machine that fed the hose.


Blowing in the insulation.


Holes after they are filled and plugged.


The plugs were made from a sheet of insulation board.  They used a hole saw bit slightly larger than the size of the hole to make sure they were a snug fit.  The plugs were wedged in and recessed by 1/8" or 1/4"

I didn't go around and count the holes, but I'm guessing there are about 100 - 125 throughout the house.  And I will admit to feeling terrified over the thought of drilling that many 2" holes in the walls.  I guess it's not as bad as I thought it would be, but it's going to take some work to make the holes disappear.

We spent about two hours last night filling them with drywall compound.  Since the holes are so big, it will probably be a couple of days before they are dry and ready for the next coat.  We are hoping two or three coats does the trick.

Insulating the house puts us one step closer to painting (and I've been dying to paint since we first looked at this place!)  This week's plan is to finish hiding the holes and getting the remainder of the walls prepped for priming.  I can't tell you how much I'm looking forward to getting rid of the yellow, orange and blue walls!

LinkWithin

Related Posts with Thumbnails